CoqIDE
The Coq Integrated Development Environment (CoqIDE) is a user-friendly GUI for Coq. Its main purpose is to allow users to edit Coq scripts and step forward and backward through them. Stepping forward executes commands and tactics while stepping backward undoes previously executed commands and tactics, returning to a previous state.
To run CoqIDE, enter coqide on the command line.
If you include script file names (which end with .v) as arguments, each is opened
in a separate tab. If you don't, CoqIDE opens a single unnamed buffer
(titled *scratch*). coqide also accepts many of the options of coqtop
(see Coq commands), while ignoring the ones that aren't meaningful
for CoqIDE. Use coqide --help to see the list of command line options.
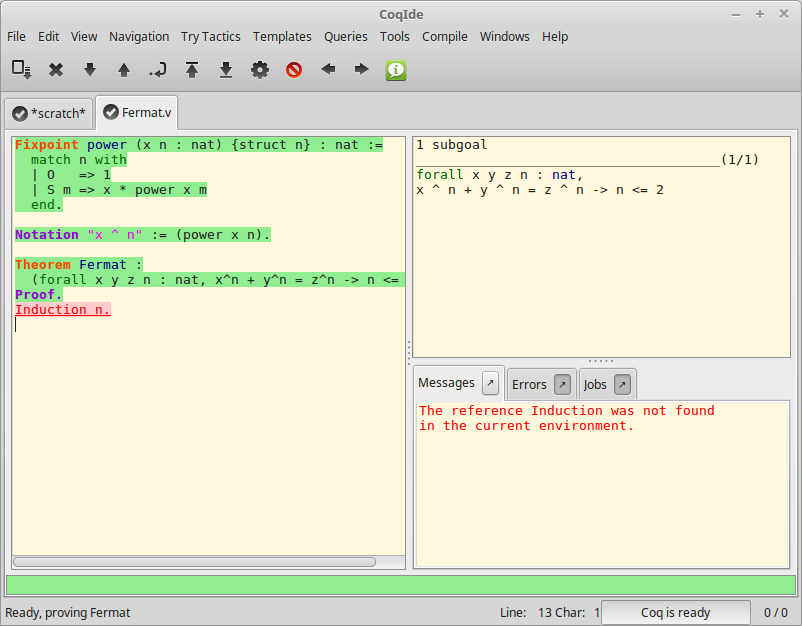
The screenshot shows CoqIDE as the user is stepping through the file Fermat.v.
A menu bar and a tool bar appear at the top of the window. The left-hand panel shows
the current script buffer. Each script buffer corresponds to a separate Coq process.
The upper right panel is the proof panel, which shows the goals to be proven.
The lower right panel has three tabs: the Messages
panel, which shows messages produced by commands and tactics; the Errors panel,
which shows errors detected when running in async mode and the
Jobs panel, which shows information on the worker processes used by async mode.
The contents of the right-hand panels are specific to the currently-displayed script.
Click the arrow icons to detach these panel into separate windows. The proof panel
can be detached from the Windows/Detach Proof menu item.
The status bar is a line of text that appears at the bottom of the window.
Managing files and buffers, basic editing
The File menu lets you open files into buffers, create new buffers, save buffers to files, and print or export them in various formats.
Text editing provides the basic operations such as copy, cut, paste, find and replace.
Most editing operations are shown in the Edit menu. Keystroke equivalents (if defined)
for menu items are shown on the right of each item. If you need more complex editor
commands, you can launch an external text editor on the current buffer, using the
Edit/External Editor menu. (Use Edit/Preferences/Externals/External Editor to
specify the external text editor.) When you're done editing, you currently must
reopen the file to see your changes. Also note:
Undo is also available as
Ctrl-Z(Cmd-Zon macOS). Redo isCtrl-Shift-Z(Shift-Cmd-Zon macOS).Select all is
Ctrl-A(Cmd-Aon macOS).HomeandEndmove the cursor to the beginning or end of the current line.If you remove the default bindings for
Ctrl-HomeandCtrl-End, these keys will move the cursor to the beginning or end of the buffer.Ctrl-Deletedeletes a word of text after the cursorCtrl-Backspacedeletes a word of text before the cursorCommenting and uncommenting the current line or selected text is available in the Tools menu. If some text is selected, exactly that text is commented out; otherwise the line containing the cursor is commented out. To uncomment, position the cursor between
(*and*)or select any text between them.
Files are automatically saved periodically to a recovery file. For example,
foo.v is saved to #foo.v# every 10 seconds by default. You can change the
interval in the Edit / Preferences / Files dialog. In some cases when CoqIDE
exits abruptly, it saves named buffers in <NAME>.crashcoqide in the same
directory as <NAME>. Unnamed buffers are saved in
Unnamed_coqscript_<N>.crashcoqide in the directory that CoqIDE was started in.
In the View menu, you can set several printing options that
correspond to options that can appear in the script. For example, "Display
notations" on the menu corresponds to the Printing Notations flag. You
should use the menu instead of controlling these settings in your script.
Running Coq scripts
Operations for running the script are available in the Navigation menu, from the toolbar and from the keyboard. These include:
Forward (
Ctrl-Down) to run one command or tacticBackward (
Ctrl-Up) undo one command or tacticRun to cursor (
Ctrl-Right) to run commands up to the cursorRun to end (
Ctrl-End) to run commands to the end of the bufferReset Coq (
Ctrl-Home) to restart the Coq processInterrupt to stop processing commands after the current command completes. (Note: on Windows but not on WSL, Interrupt doesn't work if you start CoqIDE as a background process, e.g.
coqide &in bash. See Coq issue #16142).
Tooltips identify the action associated with each toolbar icon.
Commands may:
Complete successfully. In this case, the background of the command is marked with the "processed" color (green by default), except for
Axioms andAdmitteds, which are marked in light orange to indicate they are unproven assumptions.Complete with a warning. In this case, the warning appears in the messages panel in yellow. The background of the command is marked with the "processed" color and the text is shown in blue and underlined. The message text is available as a tooltip on the text of the command.
Fail with an error. If you're stepping through the proof line by line, the error message appears in the message panel in red and the command is shown in red and underlined with a pink background. If you're in async mode, described in more detail below, the message appears in the errors panel. Double click on an entry to jump to the point of the error. Execution of commands stops unless you're in async mode.
In the previous figure CoqIDE main screen,
the running buffer is Fermat.v. All commands until
the Theorem have already been executed, then the user tried to go
forward executing Induction n. That command failed because no such
tactic exists (names of standard tactics are written in lowercase).
The failing command has been underlined.
If you're not in async mode and you modify the processed part of the buffer,
everything after that point is undone. Unlike in coqtop, you should not use
Undo to go backward.
The other buttons on the toolbar do the following:
Save the current buffer (down arrow icon)
Close the current buffer ("X" icon)
Fully check the document (gears icon) - for async mode
Previous occurrence (left arrow icon) - find the previous occurrence of the current word (The current word is determined by the cursor position.)
Next occurrence (right arrow icon) - find the next occurrence of the current word
The colored ribbon appearing across the bottom of the CoqIDE window just above
the status bar represents the state of processing for the current script
schematically. Blue means unprocessed, light green means successfully
processed, red mean an error, light orange is used for Axiom and Admitted
and gray for proofs awaiting their final check. Clicking on the bar moves the
script cursor to the corresponding part of the script. (See the next screenshot,
in the async mode section.)
The left edge of the ribbon corresponds to the first command or tactic in the script and the right edge corresponds to the last command that has been passed to Coq. Currently, for very long scripts, it may take many seconds for CoqIDE to pass all the commands to the server, causing the display to jump around a lot. Perhaps this will be improved in a future release. The text at the far right hand side of the status bar (e.g. "0 / 1" gives the number of unprocessed proofs that have been sent to Coq and the number of proofs that have errors.
Asynchronous mode
Asynchronous mode uses multiple Coq processes to process proofs in parallel with proof-level granularity. This is described in detail in Asynchronous and Parallel Proof Processing.
While synchronous mode stops processing at the first error it encounters, in async
mode, errors only stop processing the proof the error appears in.
Therefore async mode can report errors in multiple proofs without manual intervention.
In addition, async mode lets the user edit failed proofs without invalidating
successful proofs that appear after it in the script. The part of a failed proof
between Proof. and Qed. can then be edited. Quirk: the light blue part after
the error and before Qed. becomes editable only after you've changed the
error-highlighted text or before it.
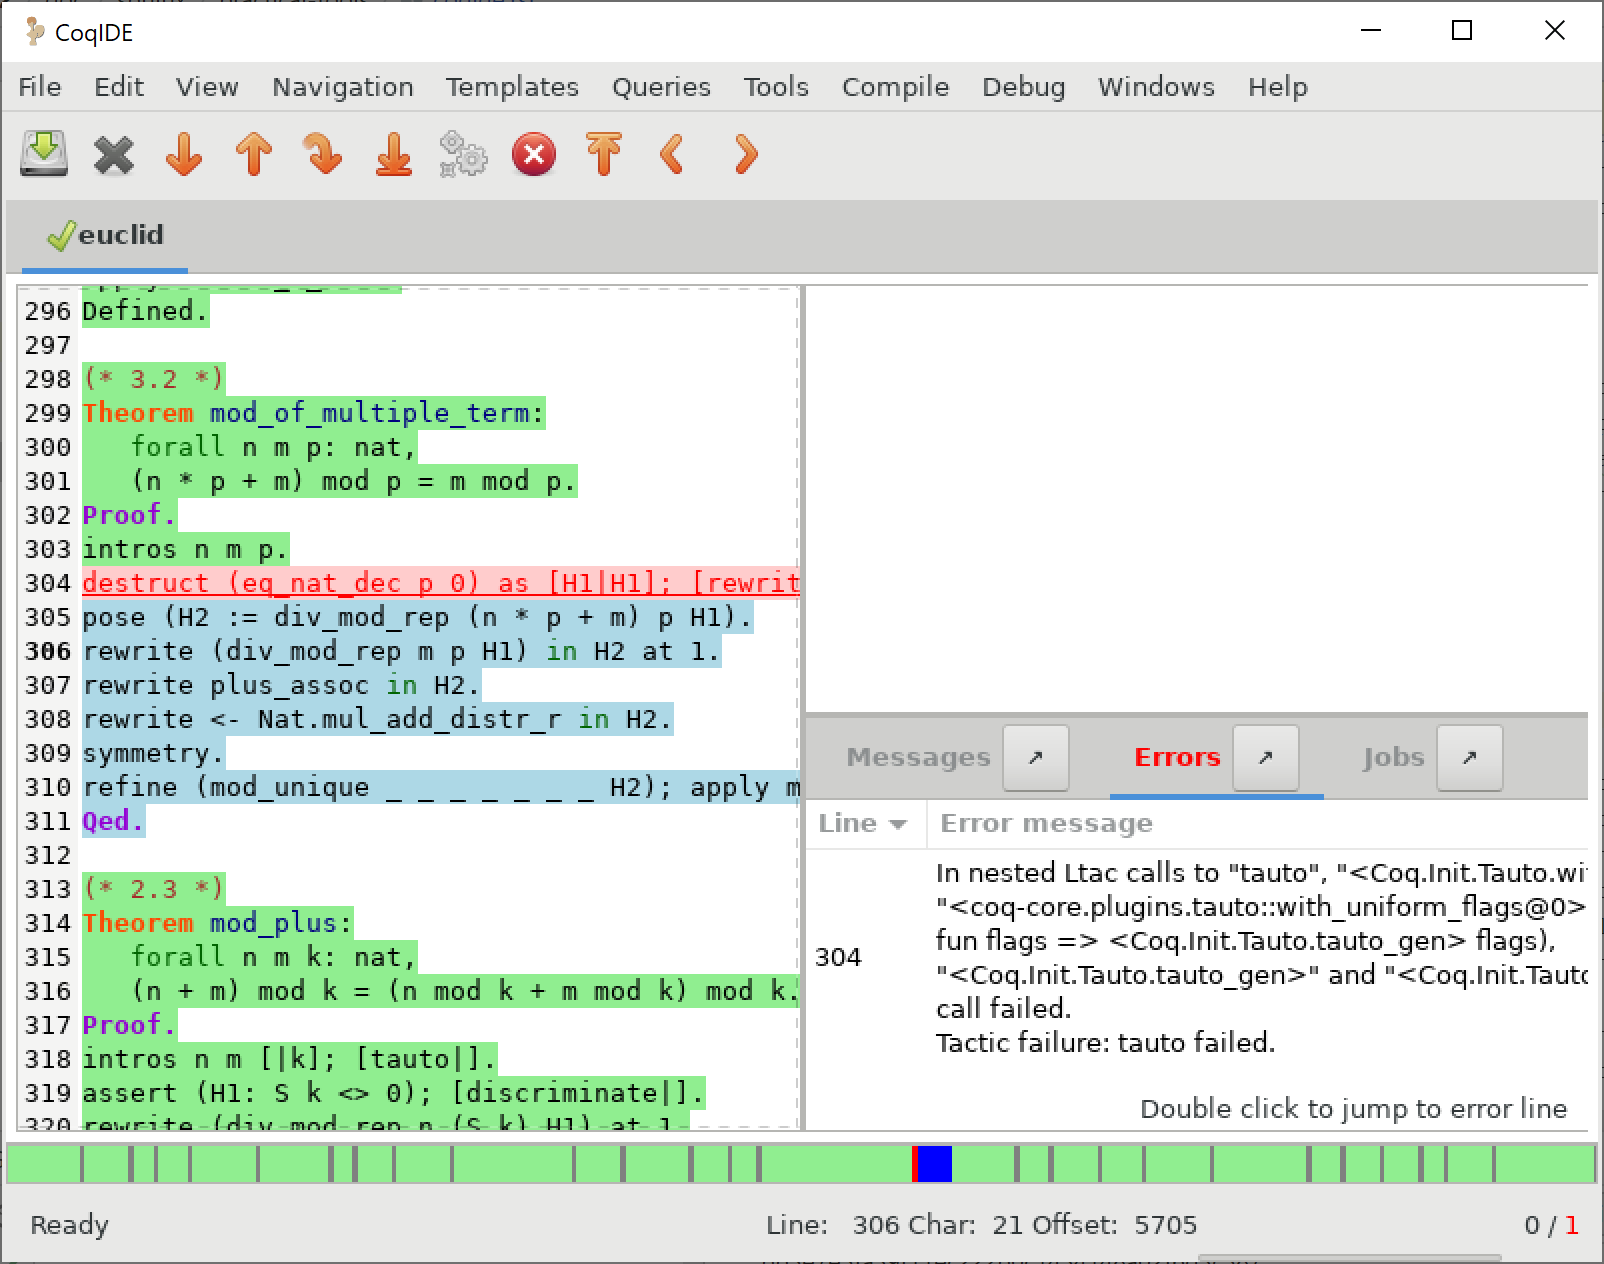
In the screenshot, the proof of the failed theorem can be edited (between Proof.
and Qed.) without invalidating the theorems that follow it. The modified
proof can then be reprocessed using the usual navigation operations. The light blue
highlight in the script indicates commands that haven't been processed.
Async mode defers the final type checking step of proofs, leaving the Qed. marked in
a slightly different shade of light blue to indicate this. To complete the final
checking, click on the "gears" button on the toolbar ("Fully check the document").
Commands and templates
The Templates menu allows using shortcuts to insert commands. This is a nice way to proceed if you're not sure of the syntax of the command you want.
Moreover, from this menu you can automatically insert templates of complex
commands like Fixpoint that you can conveniently fill in afterwards.
Queries
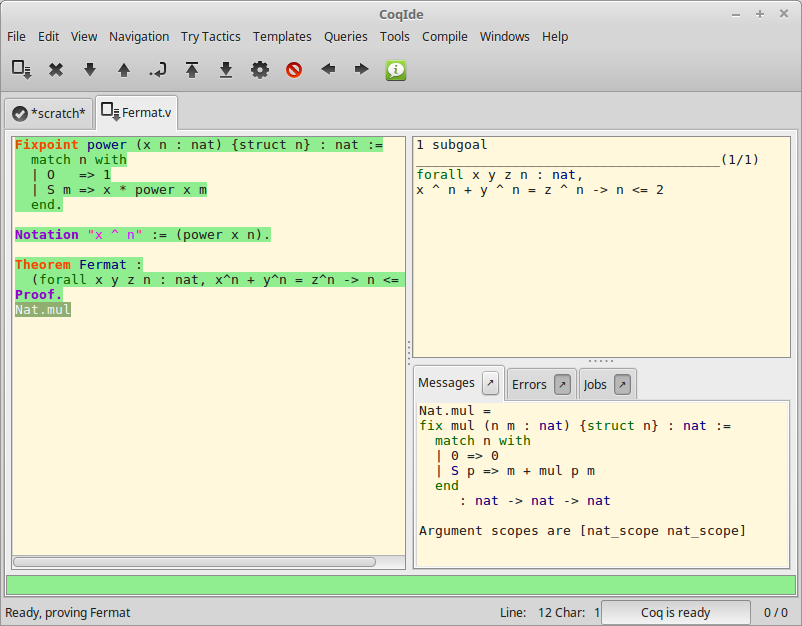
A query is any command that does not change the current state, such as
About, Check, Print, Search, etc. The query pane
lets you run such commands
interactively without modifying your script. The query pane is accessible from
the View menu, or using the shortcut F1.
You can also do queries by selecting some text, then choosing an
item from the Queries menu. The response will appear in the message panel.
The image above shows the result after selecting
Nat.mul in the bottom line of the script panel, then choosing Print
from the Queries menu.
Compilation
The Compile menu offers direct commands to:
compile the current buffer
run a compilation using
makego to the next compilation error and
create a
Makefileusingcoq_makefile.
At the moment these are not working well. We recommend you compile from a terminal window for now. We expect to fix them soon.
Compile buffer saves the current buffer and compiles it with coqc as specified
in the Externals section of the Edit/Preferences dialog. Output appears
in the Messages panel. It's mostly useful for single-file projects because it doesn't
automatically recompile other files that it depends on that may have changed.
Make and Make makefile run the make and coqmakefile commands shown in
the Externals section of the Edit/Preferences dialog. Output appears in the
Messages panel. If you use _CoqProject files, you may want to change the settings to
make -f CoqMakefile and coq_makefile -f _CoqProject -o CoqMakefile as suggested
in here. Alternatively, you may find it easier
to do your make and coq_makefile commands from the command line.
Note that you must explicitly save changed buffers before you run make.
File/Save all is helpful for this. Notice that modified and unmodified buffers show
different icons next to the filename on the tab. You may find them helpful.
To use the compiled files after compiling a project with the makefile,
you must restart the Coq interpreter (using Navigation/Start in the
menu or Ctrl-Home) for any buffer in which you're stepping through code
that relies on the compiled files.
To make changes to _CoqProject take effect, you must close and reopen buffers
associated with files in the project. Note that each buffer is independently associated
with a _CoqProject. The Project section of the Edit/Preferences` dialog
specifies the name to use for the _CoqProject file. We recommend not changing
this. Remember that these settings are done on a per-installation basis; they
currently can't be set differently for each package you're developing.
Customizations
Preferences
You may customize your environment with the Preferences dialog, which is accessible from Edit/Preferences on the menu. There are several sections:
The Fonts section is for selecting the text font used for scripts,
goal and message panels.
The Colors and Tags sections are for controlling colors and style of
the three main buffers. A predefined Coq highlighting style as well
as standard GtkSourceView styles are available. Other styles can be
added e.g. in $HOME/.local/share/gtksourceview-3.0/styles/ (see
the general documentation about GtkSourceView for the various
possibilities). Note that the style of the rest of graphical part of
CoqIDE is not under the control of GtkSourceView but of GTK+ and
governed by files such as settings.ini and gtk.css in
$XDG_CONFIG_HOME/gtk-3.0 or files in
$HOME/.themes/NameOfTheme/gtk-3.0, as well as the environment
variable GTK_THEME (search the internet for the various
possibilities).
The Editor section is for customizing the editor. It includes in
particular the ability to activate an Emacs mode named
micro-Proof-General (use the Help menu to know more about the
available bindings).
The Files section is devoted to file management: you may configure
automatic saving of files, by periodically saving the contents into
files named #f# for each opened file f. You may also activate the
revert feature: in case a opened file is modified on the disk by a
third party, CoqIDE may read it again for you. Note that in the case
you edited that same file, you will be prompted to choose to either
discard your changes or not. The File charset encoding choice is
described below in Character encoding for saved files.
Project
Appearance
The Externals section allows customizing the external commands for
compilation, printing, web browsing. In the browser command, you may
use %s to denote the URL to open, for example:
firefox -remote "OpenURL(%s)".
Shortcuts
Misc
Preferences and key bindings are saved in the user configuration directory,
which is $XDG_CONFIG_HOME/coq if the environment variable $XDG_CONFIG_HOME
is set. If the variable isn't set, the directory is ~/.config/coq on Linux
and C:\Users\<USERNAME>\AppData\Local\coq on Windows.
Preferences are in the file "coqiderc" and key bindings are in the file "coqide.keys".
Key bindings
Each menu item in the GUI shows its key binding, if one has been defined,
on the right-hand side. Typing the key binding is equivalent to selecting
the associated item from the menu.
A GTK+ accelerator keymap is saved under the name coqide.keys in
the user configuration directory.
You can modify the key binding ("accelerator") for a menu entry by
going to the corresponding menu item without releasing the
mouse button, pressing the keys you want for the new binding and then releasing
the mouse button.
Alternatively, you can edit the file directly. Make sure there are no CoqIDE processes running while you edit the file. (CoqIDE creates or overwrites the file when it terminates, which may reorder the lines).
The file contains lines such as:
; (gtk_accel_path "<Actions>/Queries/About" "<Primary><Shift>a")
; (gtk_accel_path "<Actions>/Export/Export to" "")
(gtk_accel_path "<Actions>/Edit/Find Next" "F4")
The first line corresponds to the menu item for the Queries/About menu item,
which was bound by default to Shift-Ctrl-A. "<Primary>" indicates Ctrl.
The second line is for a menu item that has no key binding.
Lines that begin with semicolons are comments created by CoqIDE. CoqIDE uses the default binding for these items. To change a key binding, remove the semicolon and set the third item in the list as desired, such as in the third line. Avoid assigning the same binding to multiple items.
If the same menu item name appears on multiple lines in the file, the value from the last line is used. This is convenient for copying a group of changes from elsewhere--just insert the changes at the end of the file. The next time CoqIDE terminates, it will resort the items.
The end of this file gives the names of the keys.
Some menu entries can be changed as a group from the Edit/Preferences/Shortcuts panel.
Key bindings that don't appear in the file such as Ctrl-A (Select All) can't be
changed with this mechanism. (At the moment, Ctrl-A does not work on Windows.)
Using Unicode symbols
CoqIDE is based on GTK+ and inherits from it support for Unicode in its text panels. Consequently a large set of symbols is available for notations. Furthermore, CoqIDE conveniently provides a simple way to input Unicode characters.
Displaying Unicode symbols
You just need to define suitable notations as described in the chapter Syntax extensions and notation scopes. For example, to use the mathematical symbols ∀ and ∃, you may define:
- Notation "∀ x .. y , P" := (forall x, .. (forall y, P) ..) (at level 200, x binder, y binder, right associativity) : type_scope.
- Notation "∃ x .. y , P" := (exists x, .. (exists y, P) ..) (at level 200, x binder, y binder, right associativity) : type_scope.
A small set of such notations are already defined in the Coq library
which you can enable with Require Import Unicode.Utf8 inside CoqIDE,
or equivalently, by starting CoqIDE with coqide -l utf8.
However, there are some issues when using such Unicode symbols: you of
course need to use a character font which supports them. In the Fonts
section of the preferences, the Preview line displays some Unicode
symbols, so you could figure out if the selected font is OK. Related
to this, one thing you may need to do is choosing whether GTK+ should
use antialiased fonts or not, by setting the environment variable
GDK_USE_XFT to 1 or 0 respectively.
Bindings for input of Unicode symbols
CoqIDE supports a builtin mechanism to input non-ASCII symbols.
For example, to input π, it suffices to type \pi then press the
combination of key Shift+Space (default key binding). Often, it
suffices to type a prefix of the latex token, e.g. typing \p
then Shift+Space suffices to insert a π.
For several symbols, ASCII art is also recognized, e.g. \-> for a
right arrow, or \>= for a greater than or equal sign.
A larger number of latex tokens are supported by default. The full list is available here: https://github.com/coq/coq/blob/master/ide/coqide/default_bindings_src.ml
Custom bindings may be added, as explained further on.
The mechanism is active by default, but can be turned off in the Editor section of the preferences.
Note
It remains possible to input non-ASCII symbols using system-wide approaches independent of CoqIDE.
Adding custom bindings
To extend the default set of bindings, create a file named coqide.bindings
in the user configuration directory.
The file coqide.bindings should contain one
binding per line, in the form \key value, followed by an optional priority
integer. (The key and value should not contain any space character.)
Example
Here is an example configuration file:
\par ||
\pi π 1
\le ≤ 1
\lambda λ 2
\lambdas λs
Above, the priority number 1 on \pi indicates that the prefix \p
should resolve to \pi, and not to something else (e.g. \par).
Similarly, the above settings ensure than \l resolves to \le,
and that \la resolves to \lambda.
It can be useful to work with per-project binding files. For this purpose
CoqIDE accepts a command line argument of the form
-unicode-bindings file1,file2,...,fileN.
Each of the file tokens provided may consists of one of:
a path to a custom bindings file,
the token
default, which resolves to the default bindings file,the token
local, which resolves to thecoqide.bindingsfile stored in the user configuration directory.
Warning
If a filename other than the first one includes a "~" to refer
to the home directory, it won't be expanded properly. To work around that
issue, one should not use comas but instead repeat the flag, in the form:
-unicode-bindings file1 .. -unicode-bindings fileN.
Note
If two bindings for a same token both have the same priority value (or both have no priority value set), then the binding considered is the one from the file that comes first on the command line.
Character encoding for saved files
In the Files section of the preferences, the encoding option is related to the way files are saved.
If you have no need to exchange files with non-UTF-8 aware applications, it is better to choose the UTF-8 encoding, since it guarantees that your files will be read again without problems. (This is because when CoqIDE reads a file, it tries to automatically detect its character encoding.)
If you choose something else than UTF-8, then missing characters will
be written encoded by x{....} or x{........} where each dot is
an hexadecimal digit: the number between braces is the hexadecimal
Unicode index for the missing character.
Debugger
Version 8.15 introduces a visual debugger for Ltac tactics within
CoqIDE. It supports setting breakpoints visually and automatically
displaying the stopping point in the source code with "continue",
"step over" "step in" and "step out" operations. The call stack and variable
values for each stack frame are shown in a new panel.
The debugger is based on the non-visual Ltac debugger.
We'd like to eventually support other scripting facilities such as Ltac2.
Since the visual debugger is new in 8.15, you may encounter bugs or usability issues.
The behavior and user interface will evolve as the debugger is refined.
There are notes on bugs and potential enhancements at the end of
this page.
Feel free to suggest changes and improvements by opening an issue on
GitHub, or contact @jfehrle
directly through email, Zulip or Discourse.
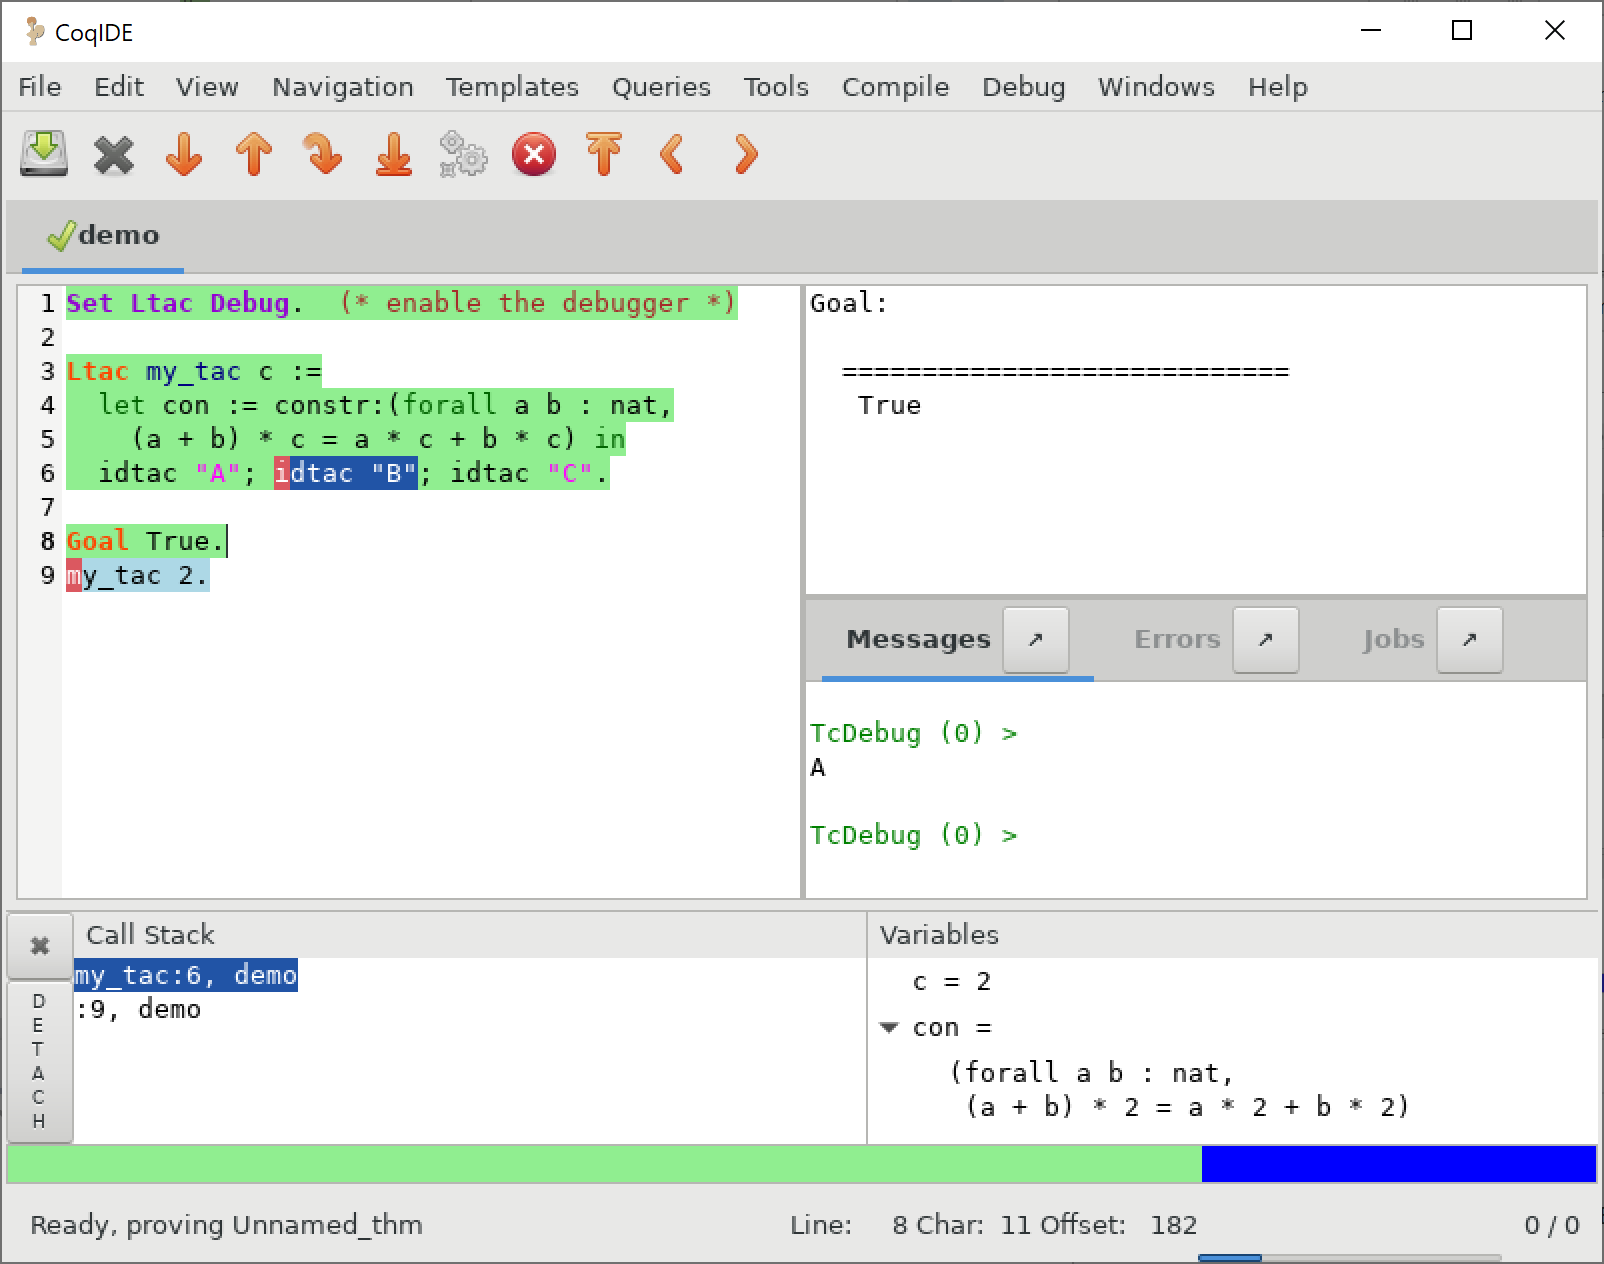
Breakpoints
This screenshot shows the debugger stopped at a breakpoint in the Ltac tactic
my_tac. Breakpoints are shown with a red background and the stopping point is
shown with a dark blue background. Set Ltac Debug. enables stopping in the
debugger.
You can control the debugger with function and control keys. Some messages are shown in the Messages panel. You can type debugger commands in that panel when it shows the debug prompt.
The script is not editable while Coq is processing tactics or stopped in the debugger. When Coq is stopped in the debugger (e.g., at a breakpoint), the blue segment in the "in progress" slider at the bottom edge of the window will be stopped at the left hand edge of its range.
The function keys are listed, for the moment, with one exception, in the Debug menu:
- Toggle breakpoint (F8)
Position the cursor just before the first character of the tactic name in an Ltac construct, then press F8. Press again to remove the breakpoint. F8 is accepted only when all of the coqtop sessions are idle (i.e. at the debug prompt or not processing a tactic or command).
Note that sentences containing a single built-in tactic are not Ltac constructs. A breakpoint on
intros., for example, is ignored, while breakpoints on either tactic inintros; idtac.work. A breakpoint on, say,my_ltac_tactic.also works.Breakpoints on Ltac
value_tactics, which compute values without changing the proof context, such aseval, are ignored.You must set at least one breakpoint in order to enter the debugger.
- Continue (F9)
Continue processing the proof. If you're not stopped in the debugger, this is equivalent to "Run to end" (Control End).
- Step over (Control ↓)
When stopped in the debugger, execute the next tactic without stopping inside it. If the debugger reaches a breakpoint in the tactic, it will stop. This is the same key combination used for "Forward one command"—if you're stopped in the debugger then it does a "Step over" and otherwise it does a "Forward". Combining the two functions makes it easy to step through a script in a natural way when some breakpoints are set.
- Step in (F10)
When stopped in the debugger, if next tactic is an
Ltac tactic, stop at the first possible point in the tactic. Otherwise acts as a "step over".- Step out (Shift F10)
When stopped in the debugger, continue and then stop at the first possible point after exiting the current
Ltac tactic. If the debugger reaches a breakpoint in the tactic, it will stop.- Break (F11)
Stops the debugger at the next possible stopping point, from which you can step or continue. (Not supported in Windows at this time.)
Note that the debugger is disabled when CoqIDE is running multiple worker processes, i.e. running in async mode. Going "Forward" a single step at a time doesn't use async mode and will always enter the debugger as expected. In addition, the debugger doesn't work correctly in some cases involving editing failed proofs in asymc mode ( see #16069.)
If you step through idtac "A"; idtac "B"; idtac "C"., you'll notice that the
steps for my_tac are:
idtac "A"; idtac "B"; idtac "C"idtac "A"; idtac "B"idtac "A"idtac "B"idtac "C"
which reflects the two-phase execution process for the tactic ; tactic
construct.
Also keep in mind that Ltac backtracking may cause the call stack to revert to
a previous state. This may cause confusion. Currently there's no special
indication that this has happened.
Call Stack and Variables
The bottom panel shows the call stack and the variables defined for the selected
stack frame. Stack frames normally show the name of tactic being executed, the line
number and the last component of the filename without the .v suffix.
The directory part of the module name is shown when the frame is not in
the toplevel script file. For example,
make_rewriter:387, AllTactics (Rewriter.Rewriter) refers to the file
with the module name Rewriter.Rewriter.AllTactics.
Note: A few stack frames aren't yet displayed in this described format (e.g. those starting
with ???) and may be extraneous. In some cases, the tactic name is not shown.
Click on a stack frame or press the Up (↑) or Down (↓) keys to select a stack frame. Coq will jump to the associated code and display the variables for that stack frame. You can select text with the mouse and then copy it to the clipboard with Control-C. Control-A selects the entire stack.
The variables panel uses a tree control to show variables defined in the selected stack frame. To see values that don't fit on a single line, click on the triangle. You can select one or more entries from the tree in the usual way by clicking, shift-clicking and control-clicking on an entry. Control-A selects all entries. Control-C copies the selected entries to the clipboard.
Note: Some variable are not displayed in a useful form. For example, the value
shown for tac in a script containing let tac = ltac:(auto) appears
only as <genarg:tacvalue>. We hope to address this soon.
The DETACH button moves the debugger panel into a separate window, which
will make it easier to examine its contents.
Supported use cases
There are two main use cases for the debugger. They're not very compatible. Instead of showing warning messages or forcing the user to explicitly pick one mode or another, for now it's up to the user to know the limitations and work within them.
The single file case is running the debugger on a single primary script without ever stopping in other secondary scripts. In this case, you can edit the primary script while Coq is not running it nor stopped in the debugger. The position of breakpoints will be updated automatically as you edit the file. It's fine to run the debugger in multiple buffers--you will not be confused. The single-file case is preferable when you can use it.
The multi-file case is when a primary script stops in a secondary script. In this
case, breakpoints in the secondary script that move due to script editing may no longer
match the locations in the compiled secondary script. The debugger won't stop at these
breakpoints as you expect. Also, the code highlighted for stack frames in that
script may be incorrect. You will need to re-compile
the secondary script and then restart the primary script (Restart, Ctrl-HOME) to get back
to a consistent state.
For multi-file debugging, we suggest detaching the Messages, Proof Context and Debugger panels so they are in separate windows. To do so, click on the arrow icon next to "Messages", select "Windows / Detach Proof" from the menu and click on "DETACH" in the Debugger panel. Note that the Debugger panel is initially attached to the Script panel of the toplevel script. Also note that, for now, the "in progress" slider is accurate only when the associated toplevel script panel is visible.
If a debugger instance is stopped in a secondary script, the debugger function keys are directed to the debugger instance associated with the primary script. The debugger doesn't attempt to support multiple instances stopped in the same secondary script. If you have a need to do this, run each debugger instance in a separate CoqIDE process/window.
Note that if you set a breakpoint in a script that may be called by multiple debugger instances, you may inadvertently find you've gotten into unsupported territory.